Tutorial 1: Creating a Basic Image Viewer
In this tutorial we will create a basic image viewer application using a combination of NeoFM/FTP and VisualNEO Win's built-in objects. The image viewer will consist of a NeoFM/FTP File Browser and a VisualNEO Win Picture object.
Getting Started
We recommend that you start with a new VisualNEO Win publication.
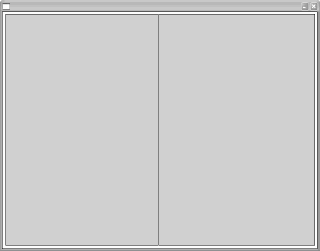
1. Begin by using VisualNEO Win's Rectangle tool ![]() to define the location on the screen where you want NeoFM/FTP's File Browser to appear. To do this, select the Rectangle tool from VisualNEO Win's Tool Palette and draw a box on your publication. When your publication runs, the rectangle will be replaced by the File Browser, so leave some room on the right side of the screen to display the images we select. After creating the rectangle, your screen should look like this:
to define the location on the screen where you want NeoFM/FTP's File Browser to appear. To do this, select the Rectangle tool from VisualNEO Win's Tool Palette and draw a box on your publication. When your publication runs, the rectangle will be replaced by the File Browser, so leave some room on the right side of the screen to display the images we select. After creating the rectangle, your screen should look like this:

2. Next, use VisualNEO Win's Picture tool ![]() to add a Picture object to the publication. To do this, select the Picture tool from VisualNEO Win's Tool Palette and draw a box on your publication.
to add a Picture object to the publication. To do this, select the Picture tool from VisualNEO Win's Tool Palette and draw a box on your publication.
Note: Hold down your keyboard's Ctrl key while drawing the box to bypass the Windows file selector that normally appears after creating a Picture object. If the file selector does appear, simply select any image you find on your hard drive. The image you select doesn't matter since we'll change this later.
The Picture will be used to display a preview of the images we select from our file list. If needed, adjust the size of the Rectangle and Picture objects so that each takes up about 1/2 of the publication's workspace. Your screen should now look like this:
3. Right click the Picture object to display the Picture Properties dialog.
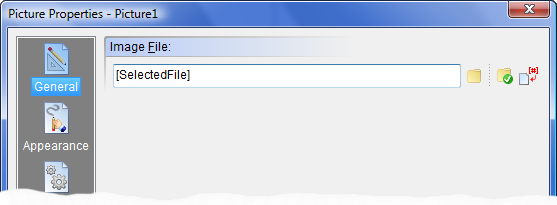
4. Replace the contents of the Image File property with the following:
[SelectedFile]
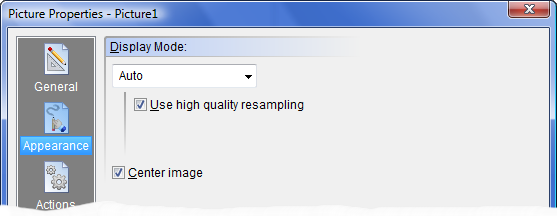
5. Click the Appearance icon on the left side of the Picture Properties dialog.

6. Select Auto from the list of Display Modes and enable the Center Image option.
7. Click OK to save the changes to the Picture object.
8. When our image viewer first starts we need to connect to the local file system and open a File Browser. A good place to put initialization stuff like this is in the publication's StartUp script. To access the StartUp script, select Book Properties > Actions from VisualNEO Win's Book menu.

The Book Properties screen will appear with the empty StartUp script displayed.
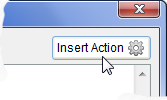
9. The first thing we want to do is add the action that will connect to the local file system. To do this click the Insert Action button in the upper right corner of the StartUp script editor.
10. Locate and select the NeoFM/FTP category among the icons on the left side of the Action Selector.

Note: If you don't see an icon for NeoFM/FTP, then you have not properly installed the plug-in. See Install Plug-Ins in VisualNEO Win's Options menu.
11. After selecting the NeoFM/FTP icon, select fmConnectLocal from the right side of the screen. The following dialog box will appear:
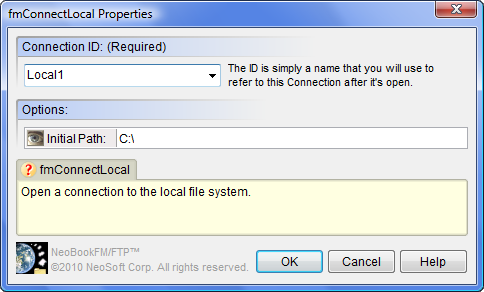
12. The first parameter is the Connection ID, which is simply a name that we will use to refer to this connection in the future. It can be anything you like, but it's often easiest to use something short and descriptive. We'll use this ID later for other commands.
For this tutorial, enter Local1 for the Connection ID and C:\ for the Initial Path.
13. Click OK to add fmConnectLocal to the StartUp script.
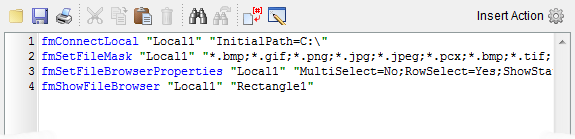
14. Click the Insert Action button again and select the fmSetFileMask action.
15. In the fmSetFileMask properties screen, enter the following:
Connection ID: |
Local1 |
Mask: |
*.bmp *.gif *.png *.jpg *.jpeg *.pcx *.bmp *.tif |
16. Click OK to add fmSetFileMask to the StartUp script.
17. Click the Insert Action button and select the fmSetFileBrowserProperties action.
18. Set the following fmSetFileBrowserProperties action properties:
Connection ID: |
Local1 |
MultiSelect: |
No |
RowSelect: |
Yes |
ShowStatusBar: |
No |
Note: The fmSetFileBrowserProperties action includes numerous properties that are not needed for this example. Simply ignore any properties not listed above.
19. Click OK to add fmSetFileBrowserProperties to the StartUp script.
20. Click the Insert Action button once more and select the fmShowFileBrowser action.
21. Set the following fmShowFileBrowser action properties:
Connection ID: |
Local1 |
Rectangle object: |
Rectangle1 |
Note: If the Rectangle object you created in step 1 has a name other than "Rectangle1" then substitute that name above.
22. Click OK to add fmShowFileBrowser to the StartUp script.
23. Your screen should now look like this:
24. Click the OK button at the bottom of the Book Properties screen to save the StartUp script.
25. Next, we need to create a special subroutine to update our Picture object whenever a file is highlighted. Select Subroutines > New from VisualNEO Win's Book menu. The New Subroutine dialog box will appear.
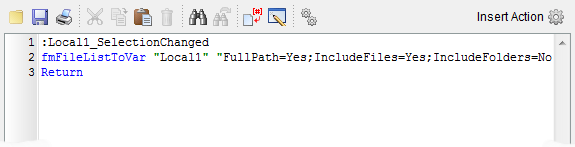
26. Enter Local1_SelectionChanged in the Subroutine name field and click OK.

27. The Subroutine section of the Book Properties screen will be displayed. The new Local1_SelectionChanged subroutine will be automatically added to the editor. All we need to do is add one more action and we're done. Position the text cursor between the ":Local1_SelectionChanged" and "Return" lines. Then click the Insert Action button.

28. Select the fmFileListToVar action from the Action Selector. The following dialog box will appear:
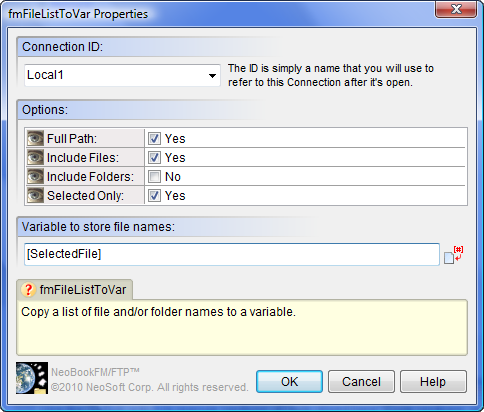
29. Set the following fmFileListToVar action properties:
Connection ID: |
Local1 |
FullPath: |
Yes |
IncludeFiles: |
Yes |
IncludeFolders: |
No |
SelectedOnly: |
Yes |
Variable: |
[SelectedFile] |
30. Click OK to add fmFileListToVar to the subroutine.
31. Your screen should now look like this:
32. Let's test the publication. Select Run (From Start) from VisualNEO Win's Book menu.
Note: Since our publication contains a StartUp action, you must use the Run (From Start) command.
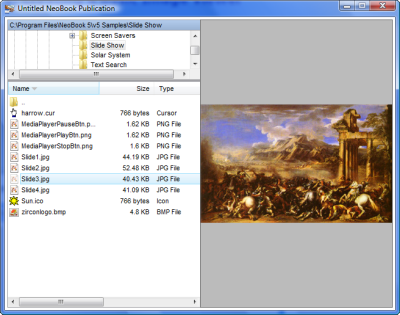
33. Your screen should look like this:

Notice that the Rectangle object on the left side of the screen has been replaced by a live Windows Explorer-style File Browser. Using the File Browser, navigate to a folder on your hard drive that contains some images in png, jpeg, pcx, bmp or tiff format. Then click one of the image files to see a preview on the right side of the screen.
34. When you're finished testing, click the publication window’s Close button or press the Esc key on your keyboard.
To compile this publication, simply select Compile from VisualNEO Win's Book menu and compile as you would any other project.